Features:
Animation With Filmstrips
How NPR uses JPEGs and CSS to work around the anigif

Stills from the NPR filmstrip
This post was originally published on the NPR Visuals Team blog.
Animated gifs have immediate visual impact—from space cats to artistic cinemagraphs. For NPR’s “Planet Money Makes A T-Shirt” project, we wanted to experiment with using looping images to convey a quick concept or establish a mood.
However, GIF as a format requires so many compromises in image quality and the resulting files can be enormous. A few months ago, Zeega‘s Jesse Shapins wrote about a different technique that his company is using: filmstrips. The frames of the animation are stacked vertically and saved out as a JPG. The JPG is set as the background image of a div, and a CSS animation is used to shift the y-position of the image.
Benefits of this approach:
- Potentially better image quality and lower filesize than an equivalent GIF
- Since the animation is done in code, rather than baked into the image itself, you can do fun things like toy with the animation speed or trigger the animation to pause/play onclick or based on scroll position, as we did in this prototype.
Drawback:
- Implementation is very code-based, which makes it much more complicated to share the animation on Tumblr or embed it in a CMS. Depending on your project needs, this may not matter.
We decided to use this technique to show a snippet of a 1937 Department of Agriculture documentary in which teams of men roll large bales of cotton onto a steamboat. It’s a striking contrast to the highly efficient modern shipping methods that are the focus of this chapter, and having it play immediately, over and over, underscores the drudgery of it.

This is just a screenshot. You can see the animated version in the “Boxes” chapter of the t-shirt site.
Making a Filmstrip
The hardest part of the process is generating the filmstrip itself. What follows is how I did it, but I’d love to find a way to simplify the process.
First, I downloaded the highest-quality version of the video that I could find from archive.org. Then I opened it in Adobe Media Encoder (I’m using CS5, an older version).
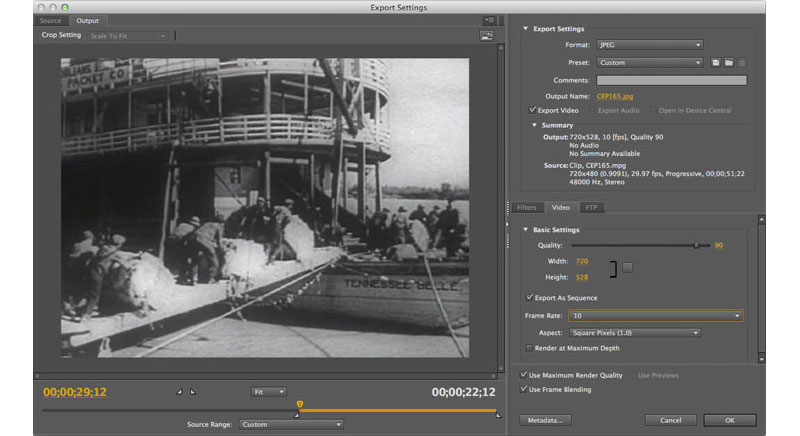
I flipped to the “output” tab to double-check my source video’s aspect ratio. It wasn’t precisely 4:3, so the encoder had added black bars to the sides. I tweaked the output height (right side, “video” tab) until the black bars disappeared. I also checked “Export As Sequence” and set the frame rate to 10. Then, on the left side of the screen, I used the bar underneath the video preview to select the section of video I wanted to export.
The encoder saved several dozen stills, which I judged was probably too many. I went through the stills individually and eliminated unnecessary ones, starting with frames that were blurry or had cross-fades, then getting pickier. When I was done, I had 25 usable frames. (You may be able to get similar results in less time by experimenting with different export frame rates from Media Encoder.)
Then I used a Photoshop script called Strip Maker to make a filmstrip from my frames.

And here’s the result, zoomed way out and flipped sideways so it’ll fit onscreen here:

I exported two versions: one at 800px wide for desktop and another at 480px for mobile. (Since the filmstrip went into the page as a background image, I could use media queries to use one or the other depending on the width of the viewport.) Because the image quality in the source video was so poor, I could save the final JPG at a fairly low image quality setting without too much visible effect. The file sizes: 737KB for desktop, 393KB for mobile.
And Now the Code
Here’s how it appeared in the HTML markup:
And the LESS/CSS:
Key things to note:
.filmstripis set to stretch to the height/width of its containing div, .filmstrip-wrapper. The dimensions of.filmstrip-wrapperare explicitly set to define how much of the filmstrip is exposed. I initially set its height/width to the original dimensions of the video (though I will soon override this via JS). The key thing here is having the right aspect ratio, so a single full frame is visible.The background-size of
.filmstripis 100% (width) and 100 times the number of frames (height) — in this case, that’s 25 frames, so 2500%. This ensures that the image stretches at the proper proportion.The background-image for
.filmstripis set via media query: the smaller mobile version by default, and then the larger version for wider screens.I’m using a separate class called
.animatedso I have the flexibility to trigger the animation on or off just by applying or removing that class..animatedis looking for a CSS animation calledfilmstrip, which I will define next in my JavaScript file.
On page load, as part of the initial JavaScript setup, I call a series of functions. One of those sets up CSS animations. I’m doing this in JS partly out of laziness — I don’t want to write four different versions of each animation (one for each browser prefix). But I’m also doing it because there’s a separate keyframe for each filmstrip still, and it’s so much simpler to render that dynamically. Here’s the code (filmstrip-relevant lines included):
I set a variable at the very beginning of the function with the number of frames in my filmstrip. The code loops through to generate CSS for all the keyframes I need (with the relevant browser prefixes), then appends the styles just before the </head> tag. The result looks like this (excerpted):
Key things to note:
The first percentage number is the keyframe’s place in the animation.
The timing difference between keyframes depends on the number of video stills in my filmstrip.
background-position: The left value is always 0 (so the image is anchored to the left of the div). The second value is the y-position of the background image. It moves up in one-frame increments (100%) every keyframe.animation-timing-function: Setting the animation to move in steps means that the image will jump straight to its destination, with no transition tweening in between. (If there was a transition animation between frames, the image would appear to be moving vertically, which is the completely wrong effect.)
Lastly, I have a function that resizes .filmstrip-wrapper and makes the filmstrip animation work in a responsive layout. This function is called when the page first initializes, and again any time the screen resizes. Here it is below, along with some variables that are defined at the very top of the JS file:
This function:
Checks the width of the outer wrapper (
.filmstrip-outer-wrapper), which is set to fill the width of whatever div it’s in;Sets the inner wrapper (
.filmstrip-wrapper) to that width; andProportionally sets the height of that inner wrapper according to its original aspect ratio.
Footnote: For the chapter title cards, we used looping HTML5 videos instead of filmstrips. My colleague Wes Lindamood found, through some experimentation, that he could get smaller files and better image quality with video. Given iOS’s restrictions on auto-playing media — users have to tap to initiate any audio or video — we were okay with the title cards being a desktop-only feature.
Credits
-
 Alyson Hurt
Alyson Hurt is the graphics editor at NPR, serving on the Visuals team (formerly News Apps + Multimedia). Previously at the Washington Post and the Arizona Republic. Graduate of ASU’s Cronkite School and Georgetown’s CCT program.

