Features:
An Accessibility Starter Kit is Already at Your Fingertips
Test your interactives right now with the built-in screen reader on your phone

All these people could be trying the screen readers on their phones. (Corey Agopian)
Like a lot of digital journalists, I ignored accessibility for years. It was easy to make excuses: I didn’t have screen reader software installed, for example. If I did get it installed, I wouldn’t have the time to learn how to use it while I was on deadline. And if I ever did get the time, most of my projects were visual in nature—no point in adapting them for users who relied on screen readers, right? I cared about accessibility, at least in the abstract. But the barrier to entry always seemed high.
The truth of the matter is that in 2018, you almost certainly have a screen reader installed and in your pocket right now. Given half an hour, you can learn how to use it effectively. And once you know your way around the tools, building accessible pages is certainly easier than, say, testing your page in Internet Explorer, or making it responsive for mobile.
Your Built-In Screen Reader is Waiting for You
When it comes to screen readers, mobile platforms actually have a couple of advantages over desktop software. Because smartphone screens are relatively small, the UI is often built around linear lists of items, which are narration-friendly. Direct touch manipulation also means that users don’t have to keep track of a mouse cursor that they can’t see. And a single-task interface reduces a lot of complexity.
Of course, the advantage for developers who don’t typically use a screen reader is that it’s never been easier or cheaper to try one. While desktop screen readers like JAWS could cost thousands of dollars, smartphones are ubiquitous—and we all spend too much time staring at them anyway. I figured out my Android phone’s TalkBack screen reader in the space of a bus ride out of Seattle’s Amazon-ridden South Lake Union neighborhood.
Both modern smartphone platforms ship with accessibility tools built-in that are effective, easy to use, and extremely helpful for development and testing. On Android, this functionality is called “TalkBack,” while on Apple devices it’s called “VoiceOver.”
In this guide, I’ll show you how to get started with both platforms. I think you’ll be surprised by how enjoyable it can be.
So once you’ve got some spare time and a phone, how do you get started?
1) Find and Adjust the Screen Reader’s Settings
First, we’re going to set up the accessibility shortcuts to quickly toggle the reader on or off. This is because, unlike the desktop tools, mobile screen readers are gestural interfaces that take over the screen completely, and once they’re enabled, you won’t be able to use normal touch controls to disable them.
For Android, with TalkBack:
In the Accessibility settings, set the volume key shortcut to “TalkBack.” The on-off shortcut is holding both volume keys down for several seconds.

The TalkBack settings are (ironically) visually indistinct, but allow you to customize its gestures.

The developer options within TalkBack settings also contain helpful advanced features.

Turn on “Display speech output” to see the voice output on-screen (useful for silent testing).

For iOS, with VoiceOver:
First, open the Accessibility section of the General settings menu.
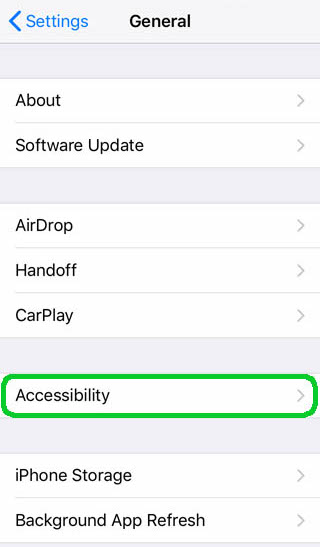
At the bottom of the menu, choose Accessibility Shortcut.

Enable “VoiceOver” to be able to toggle the screen reader with a triple-tap of the home button.

Learn to Stop the Screen Reader When You’re Stuck
Our second task is to learn to stop the screen reader from, well, reading (without disabling it completely). This is handy when you get accidentally trapped in a container filled with image URLs (you never forget your first encounter with a Leaflet map in a screen reader).
- This is a simple trick on both operating systems:
- On Android, you can tap with one finger.
- On iOS, you’ll tap with two fingers to halt the reader.
Now that you know how to stop the voice (either turning it off completely or stopping it temporarily), go ahead and use the button controls we just enabled. Remember: triple-tap the home button on iOS or press and hold the up and down volume keys on Android to start the screen reader.
2) Learn Basic Gestures
As I mentioned above, while the accessibility mode is enabled, the touchscreen will stop acting normally. Taps and swipes will no longer interact directly with applications, but will be interpreted as a gestural interface. These gestures are a little different between the two operating systems, and there’s actually a pretty coherent philosophy behind the difference, dating all the way back to 2007.
The iPhone has always been a multi-touch interface from its very first release. You may remember pinch and zoom from the famous first demo, or from the early commercials. As a result, many of VoiceOver’s gestures are also multi-touch. This makes them easier to remember, and sometimes faster to use. But it also means that it’s harder to use an iOS device with only one hand when VoiceOver is activated.
In contrast, Android didn’t initially ship with multi-touch screens, in part because those were more expensive. You couldn’t pinch to zoom in Google Maps until a few years later. So almost all gestures used by Talkback use just one finger, and for the more complex features you need to draw a simple shape on the screen. It’s harder to remember these shapes, and accuracy can be a problem (especially when you’re first learning). But once you get the hang of it, it is nice to be able to browse one-handed. All two-finger gestures will be passed through to the application as though they were a regular “touch,” which can be helpful for scrolling or using weird UI elements like sliders.
That said, the most basic gestures in both iOS and Android are the same: swipe left or right to move through elements on the page one at a time (text, buttons, menus, text inputs, etc.) and double-tap to activate the current element. Effectively, the entire interface is being converted into a giant, multi-level list, and you’re moving up and down that list.
Developer lesson: If possible, put your most important interface items higher on the page, so that readers don’t have to wade through everything else to get to them.
You can also explore the screen “by touch” by putting down a single finger and moving it around the screen: whatever is under your finger will be announced and focused, and then you can double-tap to activate. It’s the digital equivalent of feeling your way through a strange room in the dark–slow at first, but potentially much faster once you know the layout.
The green rectangle shows where the device is currently focusing:

Developer lesson: Try not to rearrange layouts or move/hide buttons if you don’t need to. Stable layouts are learnable—otherwise you’re causing users to trip over the furniture with every change.
Once you manually move the focus, the screen reader will usually hold off on reading further while it waits for additional input. If you want to start it reading again, you’ll need to tell the reader to resume. On iOS, this is as easy as swiping down with two fingers. On Android, it’s a bit more complicated by default: draw an upside-down L shape (up and to the right) for the local context menu, then select “read from next item” to continue. You may want to assign this to a secondary gesture, if you use it a lot (on my phone, I can swipe down on the fingerprint sensor to start reading).
3) Understand Landmarks
A mobile screen reader thinks of the current app or page as a giant, multi-level list. Coincidentally, you can think of all HTML as a giant, multi-level outline, starting with the <html> tag and working its way down, which makes it a great match for screen readers. Since we are more than a decade into design for mobile screens, it should be natural to think about your page construction this way as well, since it’s how most responsive designs work.
Well-constructed documents will offer “landmarks” that the reader can use to skip through the document—this is part of why it’s important to build HTML using semantic tags, like H1–6, <main>, and <nav>. Users can choose from several landmark “types” to jump around the page, such as “headers,” “links,” or “lines” to navigate more quickly or move around by a set amount.
Android: To adjust the landmark type, swipe up or down. Move between landmarks using the same left or right swipes that you use to move between elements. To return to normal reading, choose the “default” landmark type.
iOS: VoiceOver uses the concept of a “rotor” as its selection mechanism for landmarks. Using two fingers, rotate them onscreen as though you were turning a knob. You should see a visual knob appear, and let you rotate through the various settings. Swipe up or down to move between landmarks once the rotor is on the desired type.
Landmarks are an important part of a document, not just because they allow readers to move quickly through the document, but also because they provide a sense of orientation. Using semantic elements gives screen readers the ability to offer the same kinds of structural cues that visual users get from fonts and layout.
Developer lesson: Although screen readers and responsive pages are similar conceptually, remember that readers must listen to your article in a linear fashion, and can’t visually scan ahead if there aren’t landmarks at each step. Try to demarcate (or suppress) interruptions, like ads or sidebars, so that readers aren’t constantly wrenched out of the narrative.
Now, Test Your Own Work
Armed with the ability to start, stop, and navigate your phone’s screen reader, you now have the tools necessary for better development practices. Should you expect to become an accessibility expert overnight? Of course not. But building accessible news apps is easier than you might think, and basic testing will (unfortunately) put you far ahead of the average.
Once you’re comfortable with the software, try to read just one article every week without looking at the screen. You may be amazed at how cumbersome and confusing it can be on even well-designed news sites: ads that spew gibberish, galleries that trap readers in an endless stream of captions, and menu buttons that can’t be clicked.
As journalists, we’re not always in control of our content management systems, or the ads and marketing content that accumulate, barnacle-like, around the reporting itself. But I have certainly noticed that since I began using a screen reader, I have started thinking a lot more seriously about parts of the page that I had previously taken for granted, like intrusive “read more” blocks or third-party social embeds, and over which the newsroom does have control. It has also made me much more aware of how I order and organize stories.
There is a truism that accessible design makes software better for everyone, not just for users with disabilities—hence the trendy term “inclusive design.” Perhaps the same is true for us as reporters, editors, and visual journalists: a page that is better for screen readers is better for all readers. But you don’t have to take my word for it. The tools to find out are literally at your fingertips.
More to Watch and Read
- Rob Dodson’s tutorial series, A11y Casts - available for iOS as well as for Android devices
- For iOS, VoiceOver documentation
- For Android, TalkBack documentation
- Marcy Sutton’s tutorials on accessibile web development
- NVDA, an open source desktop screen reader
- A primer I’ve written on designing accessible news apps and interactives
Credits
-
 Thomas Wilburn
Thomas Wilburn is the Senior Data Editor for Chalkbeat, a nonprofit newsroom focused on education. Previously, he was a senior developer for the NPR News Apps team, and a founding member of the Seattle Times Interactives team.