Features:
How We Publish Live Chats with Slack
A full tutorial on the intricacies of a Slack-powered newsroom tool

A Slack-powered tool made publishing faster for everyone. (Perry French)
Speed. If there’s one thing journalists aim to provide, it’s relevant content as fast as possible. That’s why we don’t wait for the print deadline anymore, and it’s why liveblogs exist. We publish what we can as soon as we can.
Speed is also why we break stories on Twitter—why during live events reporters have just as much of a presence on Twitter as they do on the publication’s website. Well, we’ve learned definitively in the past few months that we can’t solely rely on these platforms to publish for us. We should be able to provide Twitter’s speed on our own. But what’s the best way to do that?
On a summer day in 2017, this was the question on all of our minds as we met with Megan Garvey, who was then the Deputy Managing Editor for Digital at the Los Angeles Times. I had just finished my Slack homepage buttons (a toolkit for managing our homepage from Slack) and was brought in to provide insight on the platform (I think). What if we could use Slack, a tool most reporters were already familiar with using, to power live up-to-the-second content. Well…we could…quite easily actually thanks to Slack’s APIs. As the (self-titled) LA Times Slack developer intern, I got to work.
I’ll admit: we weren’t the first ones to come up with this idea. The New York Times beat us to it in 2015, and newsrooms have been working on similar platforms ever since. At a NICAR 2018 panel on the future of live coverage, the “Live Chat” platform was debated in the context of other popular forms of live coverage including Live Blogs and Live Annotation. But what exactly is a Live Chat?
Live Chats are web pages automatically generated live from a conversation had by multiple journalists and/or experts on a separate chat interface. Because many journalists are familiar with Slack, most Live Chats use that as their backend of choice. However, getting the messages from Slack to your website’s Live Chat page involves some work, and that’s where I came in.
After a few weeks I had a prototype ready that had simple functionality: if a journalist posted a message, it was going live on a designated page…immediately. If that thought terrifies you, you’re not alone. It terrified me too. The editors at the LA Times trusted those who would be invited to these Slack channels, though, and I provided a number of ways for the chatters and editors to correct information as soon as possible. These corrections would update on the audience’s page as well—even if they didn’t refresh it.
A few months later it debuted during President Trump’s first State of the Union Address. When he started discussing the opioid crisis, viewers watching it on the LA Times website saw National Reporter Evan Halper immediately comment that “his administration’s policy on it has been unfocused and incremental so far.”
The LA Times also started using it for Lunchtime Chats with food critic Jonathan Gold in which questions are submitted through social media.
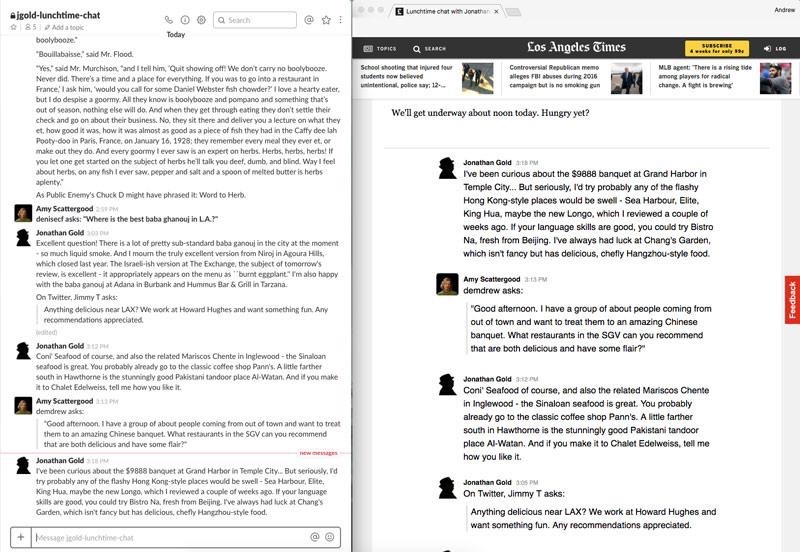
A behind-the-scenes look at the app as Jonathan Gold replies to questions curated from Twitter on his Slack account (left) and they appear online in seconds (right).
Unfortunately, I was unable to see its inaugural use because I had prior commitments, but I was told it performed well and got a lot of attention on Twitter. Other news developers were asking how it worked, and while Ben Welsh (editor at the LA Times Data Desk) did a solid job summarizing the workflow, 280 characters just isn’t enough. So I thought I’d use just a few more words to show you how to connect incoming Slack messages to a Django database.
This tutorial is designed for developers who are comfortable with Python and have a general understanding of APIs (aka webhooks, routes, etc.). You’ll also need to have pip and virtualenv installed. I’ll be using Django for this guide, but all the code will be provided with links to pages in Django’s documentation for topics I don’t dive into.
If you want an out-of-the-box app, POLITICO has open-sourced a version of this tool on their Github page. I’ve built this guide to go deeper into the intricacies of building a Slack-powered newsroom tool like this.
It’s definitely on the longer side, so you can check out the code on Github or the diagram in the webhooks section of this guide for the tl;dr. For those of you who want to make it yourself, strap in. We’ll be here a while.
Getting Everything Ready
Setting Up Django
You’ll start with Django’s default template. Open up your terminal and navigate to your code directory. There you can set up your virtual environment and Django project.
$ virtualenv chat-env
$ cd chat-env
$ . bin/activate
$ pip install django
$ django-admin startproject chat
$ cd chat
Now your virtualenv is activated and you’re inside your Django project. If you use the ls command in your terminal you should see the following:
chat manage.py
You’ll also need a couple more packages (configparser, slackclient, and slackdown). I actually built Slackdown at the LA Times for this Chat project. Click the link to learn more about how it converts Slack markup to valid HTML.
$ pip install configparser slackclient slackdown
Setting Up Slack
Now that you have your codebase setup, you’re going to need to set up your app in Slack to get some API tokens.
Go to the Slack API website to create a new app. Give it a name and choose the team you want to own the app.
Once your app is built, you’ll have to build a bot for it to interact with your team’s Slack. Navigate to Bot Users, and click “Add Bot User.” Give your bot a name and click “Add Bot User” again to confirm.
To get the credentials you’ll need, install the app on your team—even if that team is the same as the development team. Navigate to OAuth & Permission and click “Install App to Workspace.” This will take you through the default Slack authorization screen. That should redirect you to the OAuth screen. Copy the Bot User OAuth Access Token and save it for later.

You’ll also need your Slack app’s verification token to authenticate it. Navigate to Basic Information, scroll down, and find App Credentials. Copy your Verification Token and save it for later, too. You’ll come back to this page once you have your server running so leave it open.
Adjusting Your Settings
Note: Django projects name their app and project folders the same name. For this guide when I reference the Chat project folder, I’m talking about the main parent folder with manage.py in it. When I reference the Chat app folder I’m talking about the folder inside that with settings.py in it.
The first thing you need to do is make an environments file to handle all of your sensitive data. Remember NOT to upload this file to any public repo.
In your Chat project folder, make a new file called .env and paste the following in it:
# .env

[django]
secret_key =
slack_app_token =
slack_bot_token =
slack_verification_token =
The secret_key is a Django key which is generated for you and can be found in your chat/settings.py on line 23. Remove it from that file and move it to this .env file to keep it with other sensitive data out of your repo. The other three keys you should have from your Slack app. Paste them here after the = as they are—no quotes or other punctuation.
Now head over to your Chat app folder which should be pre-populated with Django project files. Open up settings.py and replace it with the following. Most of this is usual Django setup so I won’t talk about it much further, but make sure to read the inline comments if you’re unsure about something.
# chat/settings.py

import os

# Setting Up directory paths
SETTINGS_DIR = os.path.dirname(os.path.realpath(__file__))
ROOT_DIR = os.path.join(
    os.path.abspath(
        os.path.join(SETTINGS_DIR, os.path.pardir),
    ),
)
BASE_DIR = ROOT_DIR

# Importing the secret key from the .env file
SECRET_KEY = os.getenv("secret_key")

# Setting up working variables.
# These can be manually switched or imported from the .env file if you have multiple working environments.
DEBUG = True
DEBUG_TOOLBAR = True

DEVELOPMENT = True
PRODUCTION = False

# Setting up host URLs that will be able to serve our app
ALLOWED_HOSTS = []

# Adding ngrok to hosts in DEVELOPMENT (more on ngrok later)
if DEVELOPMENT:
    ALLOWED_HOSTS += '*.ngrok.io'

# Django Boilerplate
INSTALLED_APPS = [
    'django.contrib.admin',
    'django.contrib.auth',
    'django.contrib.contenttypes',
    'django.contrib.sessions',
    'django.contrib.messages',
    'django.contrib.staticfiles',
    'chat',
]

MIDDLEWARE = [
    'django.middleware.security.SecurityMiddleware',
    'django.contrib.sessions.middleware.SessionMiddleware',
    'django.middleware.common.CommonMiddleware',
    'django.middleware.csrf.CsrfViewMiddleware',
    'django.contrib.auth.middleware.AuthenticationMiddleware',
    'django.contrib.messages.middleware.MessageMiddleware',
    'django.middleware.clickjacking.XFrameOptionsMiddleware',
]

ROOT_URLCONF = 'chat.urls'

TEMPLATES = [
    {
        'BACKEND': 'django.template.backends.django.DjangoTemplates',
        'DIRS': [],
        'APP_DIRS': True,
        'OPTIONS': {
            'context_processors': [
                'django.template.context_processors.debug',
                'django.template.context_processors.request',
                'django.contrib.auth.context_processors.auth',
                'django.contrib.messages.context_processors.messages',
            ],
        },
    },
]

# SQLite Database (Django Boilerplate)
# https://docs.djangoproject.com/en/1.11/ref/settings/#databases
DATABASES = {
    'default': {
        'ENGINE': 'django.db.backends.sqlite3',
        'NAME': os.path.join(BASE_DIR, 'db.sqlite3'),
    }
}


# Password validation (Django Boilerplate)
# https://docs.djangoproject.com/en/1.11/ref/settings/#auth-password-validators
AUTH_PASSWORD_VALIDATORS = [
    {
        'NAME': 'django.contrib.auth.password_validation.UserAttributeSimilarityValidator',
    },
    {
        'NAME': 'django.contrib.auth.password_validation.MinimumLengthValidator',
    },
    {
        'NAME': 'django.contrib.auth.password_validation.CommonPasswordValidator',
    },
    {
        'NAME': 'django.contrib.auth.password_validation.NumericPasswordValidator',
    },
]


# Internationalization (Django Boilerplate)
# https://docs.djangoproject.com/en/1.11/topics/i18n/
LANGUAGE_CODE = 'en-us'

TIME_ZONE = 'UTC'

USE_I18N = True

USE_L10N = True

USE_TZ = True

STATIC_URL = '/static/'

# Adding our API keys from our .env file
SLACK_APP_TOKEN = os.getenv("slack_app_token")
SLACK_BOT_TOKEN = os.getenv("slack_bot_token")
SLACK_VERIFICATION_TOKEN = os.getenv("slack_verification_token")
A note about deployment: when you’re ready to deploy your app remember to set DEBUG, DEPLOYMENT and DEVELOPMENT to False and set PRODUCTION to True.
And one final thing you need to set up is changing the manage.py file in the Chat project folder to load your .env file when you run Django commands. Open up manage.py in the Chat project folder and replace it with the following:
# manage.py

import os
import sys
import configparser

if __name__ == "__main__":
    # Allow invoking manage.py from any directory
    repo_dir = os.path.dirname(os.path.realpath(__file__))

    # Load env variables from .env config file
    cp = configparser.ConfigParser(interpolation=None)
    cp.read(os.path.join(repo_dir, ".env"))

    # Load the files variables into the environment
    for i in cp.items('django'):
        os.environ[i[0]] = i[1]

    # Load the settings
    os.environ.setdefault("DJANGO_SETTINGS_MODULE", "chat.settings")

    from django.core.management import execute_from_command_line
    execute_from_command_line(sys.argv)
Now that your settings are done, let’s move on to the fun part: programming!
Setting Up Your Database
The key reason this guide is using Django instead of something simpler like Flask is Django’s database system. In this app, new messages from Slack will have to be saved somewhere. You can use Django to create a single SQLite file in this tutorial that can easily be upgraded later to a full database without changing much.
Take a look at what the database will look like:
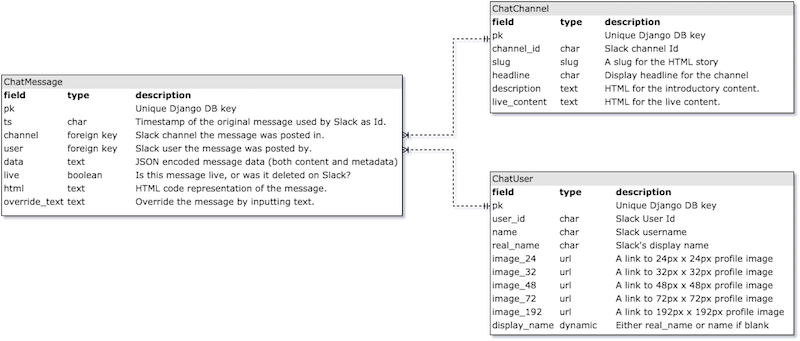
As you can see there are three tables:
ChatMessage: Every message posted to every channel you’re recording.
ChatChannels: Organizes the messages and tells your app which Slack channels in your organization to listen to.
ChatUsers: Records the Slack user information for your organization which can be displayed in various ways on the front end.
Build these tables in Django using a new models.py file in your Chat app folder.
# chat/models.py

import re
import slackdown
import json
from chat import managers
from django.db import models


class ChatChannel(models.Model):
    """
    A Slack channel logged by this application.
    """
    channel_id = models.CharField(
        unique=True,
        max_length=300,
        help_text="The id of the channel on Slack."
    )
    slug = models.SlugField(
        max_length=300,
        unique=True,
        help_text="A slug for the HTML story."
    )
    headline = models.CharField(
        max_length=300,
        help_text="Display headline for the channel."
    )
    description = models.TextField(
        max_length=1000,
        help_text="HTML for the introductory content.",
        blank=True,
    )
    live_content = models.TextField(
        max_length=1000,
        help_text="HTML for the live content.",
        blank=True,
    )

    def __str__(self):
        return self.slug


class ChatUser(models.Model):
    """
    A Slack user that creates messages.
    """
    user_id = models.CharField(
        max_length=300,
        unique=True
    )
    name = models.CharField(
        max_length=300,
        blank=True,
        help_text='The Slack username'
    )
    real_name = models.CharField(
        max_length=300,
        blank=True,
        help_text="The user's real name from Slack",
    )
    image_24 = models.URLField(max_length=1000)
    image_32 = models.URLField(max_length=1000)
    image_48 = models.URLField(max_length=1000)
    image_72 = models.URLField(max_length=1000)
    image_192 = models.URLField(max_length=1000)

    class Meta:
        ordering = ('name',)

    def __str__(self):
        return self.display_name

    # dynamic property
    @property
    def display_name(self):
        """
        Return `real_name` or `name` if there is no `real_name`.
        """
        return self.real_name or self.name


class ChatMessage(models.Model):
    """
    A Slack message posted to a channel by a user.
    """
    ts = models.CharField(
        max_length=300,
        help_text='Timestamp of the original message used by Slack as unique identifier.'
    )
    user = models.ForeignKey(
        ChatUser,
        on_delete=models.CASCADE,
        help_text='Slack user the message was posted by.'
    )
    channel = models.ForeignKey(
        ChatChannel,
        on_delete=models.CASCADE,
        help_text='Slack channel the message was posted in.'
    )
    data = models.TextField(
        max_length=6000,
        help_text="The message's data"
    )
    live = models.BooleanField(
        default=True,
        help_text='Is this message live, or was it deleted on Slack?'
    )

    html = models.TextField(
        max_length=3000,
        help_text='HTML code representation of the message.'
    )

    override_text = models.TextField(
        max_length=3000,
        blank=True,
        help_text="Override the message by putting text here."
    )

    # See next section for these managers
    objects = models.Manager()
    messages = managers.ChatMessageManager()

    class Meta:
        ordering = ("-ts",)
        get_latest_by = "ts"

    def __str__(self):
        return self.ts
That’s looking good, but there’s one more thing you need to add. You want to use Slackdown to render your Slack message data in valid HTML and save it in the HTML field any time there’s a change.
You could make it a dynamic field, but then Slackdown would have to process it every time the field is called which is wasting valuable processing power you could be using to mine for bitcoin. Instead, you can make a new function and run it every time someone saves a new message.
Unfortunately there’s one part of the Slack markdown-to-HTML processing pipeline that Slackdown can’t handle, and that’s mentions.
In Slack if you tag me in a message you see @BrizAndrew on the page, but the Slack API displays as @U0BEWDEF6 (my Slack user ID). You have to include a quick script to process that part as well. Your app will use a camel-cased version of the display name, so if my Slack username is @Breezy123, your app will still show @BrizAndrew.
To handle this processing, add the update_html and save methods to the ChatMessage model you just created.
# chat/models.py

...

class ChatMessage(models.Model):
    ...

    def update_html(self):
        """
        Updates the html field with the Slack data or
        with the override_text if it's not blank.
        """
        if self.override_text != '':
            override_text_obj = {
                'text': self.override_text
            }
            self.html = slackdown.parse(override_text_obj)
        else:
            self.html = slackdown.parse(json.loads(self.data))

        # convert user references with full names (or usernames as a fallback)
        users = re.finditer(r'@([\w\d]*)', self.html)
        for u in users:
            match = u.group(1)
            if ChatUser.objects.filter(user_id=match).exists():
                user_obj = ChatUser.objects.get(user_id=match)
                name = "@{}".format(user_obj.display_name).replace(" ", "")
                self.html = u"{}<span class='chat-mention'>{}</span>{}".format(
                    self.html[:u.start()],
                    name,
                    self.html[u.end():]
                )

    def save(self, *args, **kwargs):
        self.ts = json.loads(self.data)['ts']
        self.update_html()
        super(ChatMessage, self).save(*args, **kwargs)
You might notice there’s a live field in messages. That’s because your app keeps all messages in the database regardless of whether or not they were deleted in Slack for record keeping, but if they were deleted in Slack they shouldn’t appear in your output.
Your app handles that by using this live flag and by using a Django manager. You can read more about managers here, but for now make a new file called managers.py and paste the following code:
# chat/managers.py

from django.db import models


class ChatMessageQuerySet(models.QuerySet):
    """
    A custom QuerySet for the ChatMessage model that adds some extra features.
    """
    def live(self):
        return self.filter(live=True).order_by('-ts')


class ChatMessageManager(models.Manager):
    """
    A custom Manager for the ChatMessage model that adds some extra features.
    """
    def get_queryset(self):
        return ChatMessageQuerySet(self.model, using=self._db)

    def live(self):
        return self.get_queryset().live()
All this does is add a new way to call for only messages which are marked as live (and therefore not deleted on Slack or in the admin page) by using the following line: ChatMessage.messages.live().
Finally, you can quickly make an admin page for these models. There’s nothing that departs from ordinary Django for this file, but if you’re unfamiliar with making Django admins you can check the documentation. Add a new file in the Chat app folder called admin.py and paste the following:
# chat/admin.py

from django.contrib import admin
from .models import ChatChannel, ChatMessage, ChatUser


@admin.register(ChatChannel)
class ChatChannelAdmin(admin.ModelAdmin):
    fieldsets = (
        ("Metadata", {
            'fields': (
                'headline',
                'slug',
                'channel_id',
                'description',
                'live_content',
            )
        }),
    )
    list_display = (
        'channel_id',
        'headline',
        'slug',
    )
    search_fields = ('headline', 'slug', 'channel_id')

    save_on_top = True


@admin.register(ChatMessage)
class ChatMessageAdmin(admin.ModelAdmin):
    def overridden(self, obj):
        return obj.override_text != ''
    overridden.boolean = True

    fieldsets = (
        (None, {
            'fields': (
                'html',
                'override_text',
                'user',
                'live',
            )
        }),
    )
    list_display = (
        'ts',
        'html',
        'channel',
        'user',
        'live',
        'overridden',
    )
    search_fields = ('text', 'user')
    save_on_top = True

    list_filter = ('channel__slug', 'live')

    readonly_fields = [
        'html',
        'user',
        'live',
        'overridden',
    ]


@admin.register(ChatUser)
class ChatUserAdmin(admin.ModelAdmin):
    fieldsets = (
        ("Metadata", {
            'fields': (
                'name',
                'real_name',
                'image_24',
                'image_32',
                'image_48',
                'image_72',
                'image_192',
            )
        }),
    )
    list_display = (
        'user_id',
        'name',
        'real_name',
    )
    search_fields = ('user_id', 'name', 'real_name')
    save_on_top = True
Once you’ve done all of that, you’re ready to build the database.
As I mentioned, this example uses a SQLite server to avoid having to install extra database software on your machine. Luckily most of these steps are the same no matter what database you’re using thanks to Django. You can read more about the databases Django supports in their documentation. For now, run these commands in your terminal to build your database:
$ python manage.py makemigrations chat
$ python manage.py migrate
You’ll also have to create a superuser to be able to log in to your database admin. Use this command and follow the instructions to do so:
$ python manage.py createsuperuserAnd finally, start the server with:
$ python manage.py runserverThis will start a local server with your admin page available at http://localhost:8000/admin/. You can use the superuser login info you just created to log in.
Tunneling Your Localhost URL With Ngrok
In order to connect your app to Slack, you’ll need a publicly-available HTTPS-enabled URL (Slack’s rules). But in order to deploy your app and get that URL, you’ll need to develop it first. To solve this chicken and egg dilemma, you can use Ngrok, which provides a publicly-available https-enabled URL which is directed to a port on your localhost.
You can download Ngrok for free from their website. Once you have the executable file you can run it from your downloads folder by using the ./ngrok http 8000 terminal command. You can also put that ngrok file in /usr/local/bin in your root directory to run it from anywhere by using the ngrok http 8000 command. Note that the last argument is the port you want to tunnel, in this case (as is default with Django), the port is 8000.
Once you have it running, you should see the following with an HTTPS URL pointing (->) to your localhost port:
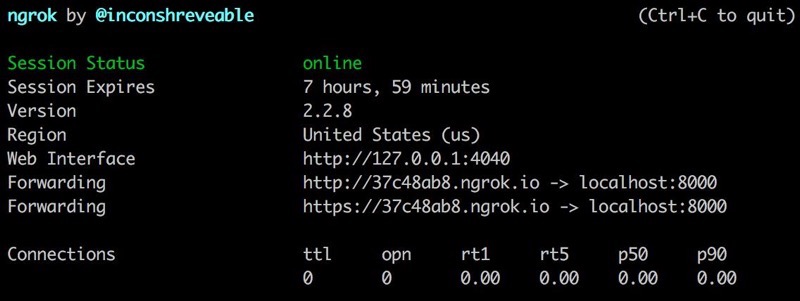
Grab that URL (https://37c48ab8.ngrok.io in the picture above) and get ready for the next section. Keep in mind that if you’re using the free version of Ngrok this URL will change every time you run it.
Opening Your Heart To Slack
Slack’s many APIs (yes that’s plural) can be confusing to developers new to the platform. The most commonly used one is the Web API, which serves as a typical social media API. Messages, channels and users can be requested, read, created, deleted, or updated. In theory, this Chat app could have been created by requesting all the messages in a channel at set intervals and saving them in a database, but that would require your server to be sending Slack requests every minute or so—introducing lag to the system and tons of wasteful requests. Luckily, Slack has a solution for that: the Events API.
Slack’s Events API is summed up in their documentation pretty aptly, “Don’t call us, we’ll call you.” With a bit of configuration in your app, you can have Slack send your server a POST request every time a particular action is taken. For the purposes of this app, you’ll only need to subscribe to the “message posted in a channel” events called message.channels (for public channels) and message.groups (for private ones), but there’s a whole list of them that you can find here.
Unfortunately, the Events API is an all-or-nothing system when it comes to what you’ve subscribed to, so if you subscribe to message.channels you’ll get every message sent in any channel. It’s up to you to filter out messages you don’t want on your own app.
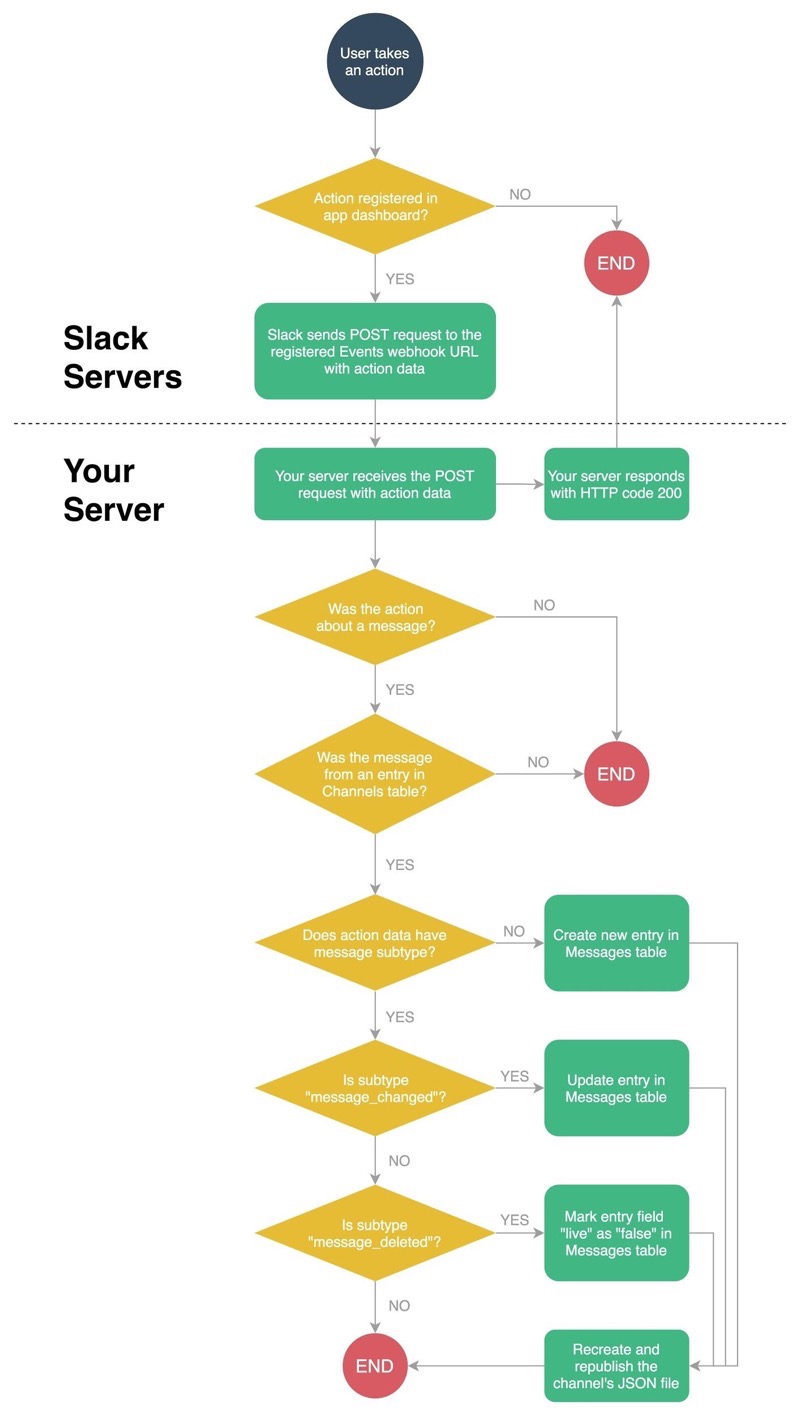
Broadly speaking, the way your app will work looks like this:
You have plenty to code, so let’s get started.
Proving Your Server’s Identity
In order to connect your server to Slack, you’ll need to first prove that it’s a valid server by completing the URL verification handshake in which Slack will send a POST request to your server that looks something like:
{
    "token": "Jhj5dZrVaK7ZwHHjRyZWjbDl",
    "challenge": "3eZbrw1aBm2rZgRNFdxV2595E9CY3gmdALWMmHkvFXO7tYXAYM8P",
    "type": "url_verification"
}
In order to complete the handshake you need to first verify that the POST request is coming from Slack (by authenticating the token value), and then respond with the challenge value in plain text.
Django handles routes through views which you can read more about in the documentation. For now, make a file called views.py in the Chat app folder. Then make your first view:
# chat/views.py

from django.views.generic import View
from django.views.generic.detail import SingleObjectMixin
from django.views.decorators.csrf import csrf_exempt
from events import SlackEventHandler


class SlackEventWebhook(SingleObjectMixin, View):
    """
    Receives the Slack Events API calls and passes it to the events handler.
    """
    @csrf_exempt
    def dispatch(self, request, *args, **kwargs):
        return super(
            SlackEventWebhook, self
        ).dispatch(request, *args, **kwargs)

    def post(self, request):
        return SlackEventHandler().handle(request)
The view will take all the Slack events traffic and pass the data to an event handler called SlackEventHandler which is in a file called events.py. That file doesn’t exist yet, so make it in the Chat app folder as well. Then make the event handler called in your view:
# chat/events.py

import json
from django.conf import settings
from django.http import HttpResponse, HttpResponseForbidden, JsonResponse


class SlackEventHandler(object):
    def handle(self, request):
        """
        Handles a Slack events POST request.
        Returns an HttpResponse.
        """
        # Parse the request body
        payload = self.parse_request(request)

        # Verify the request
        token = payload['token']
        if not self.authorize(token):
            return HttpResponseForbidden()

        # Determine the request type and correct handler function
        request_type = payload['type']
        if request_type == 'url_verification':
            event_function = self.url_verification
        else:
            return HttpResponse(status=200)

        # Runs the handler function and return the response
        return event_function(payload)

    def parse_request(self, request):
        """
        Grabs the payload body from a request.
        Returns the parsed payload as a dictionary.
        """
        payload = json.loads(request.body)
        return payload

    def authorize(self, token):
        """
        Verifies that the POST request is from Slack.
        Returns True if it is.
        """
        verify = False
        if token == settings.SLACK_VERIFICATION_TOKEN:
            verify = True

        return verify

    def url_verification(self, payload):
        """
        Returns a response with the challenge value.
        """
        response_data = {}
        response_data['challenge'] = payload['challenge']

        return JsonResponse(response_data)
As you can see the SlackEventHandler can only handle one kind of event called a url_verification.
You have your view and event handler set up. The only thing left is to set up your route. Django created the urls.py file when you first made the app. If you open it, you’ll see that the /admin path is already there. The file also has some helpful tips on making new URLs, but you can read more about making paths in the documentation. Replace your urls.py file with the following:
# chat/urls.py

from django.conf.urls import url
from django.contrib import admin
from chat import views as chat_views

urlpatterns = [
    url(r'^admin/', admin.site.urls),
    url(
        r'^slack/',
        chat_views.SlackEventWebhook.as_view(),
        name='slack-event-webhook'
    ),
]
This adds a new webhook at the route /slack/ that will be handled by the SlackEventWebhookwhich you created in views.py.
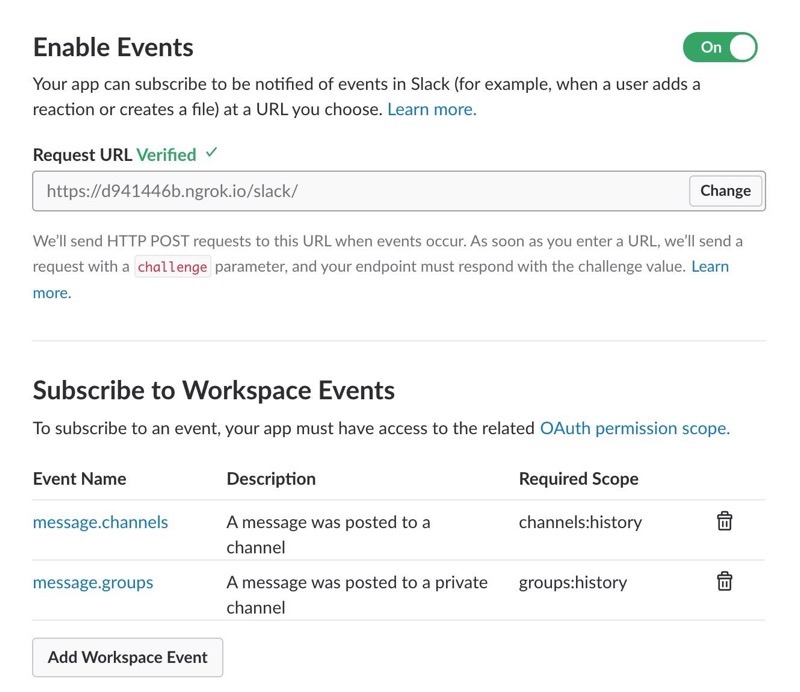
Now, turn on your server with python manage.py runserver in the terminal (if it’s not already up), and grab that https-enabled ngrok URL from earlier. Go to your app dashboard in the Slack API webpage and navigate over to Event Subscriptions.
Turn on Enable Events and paste the ngrok URL with an added /slack/ at the end (note that final / is important) into the Request URL box. So if your ngrok URL is https://37c48ab8.ngrok.io, you should paste https://37c48ab8.ngrok.io/slack/. Click out of the box, and Slack will send your server that url_verification POST request. After a few seconds it should say “Verified.”
Registering Events in Slack
Action registered in app dashboard?
Users can take many different actions in Slack which are picked up by Slack’s many listeners. These actions can range from uploading files to (as is important in your case) posting messages in channels. When Slack picks up one of these actions, it first checks to see if your app has that event registered.
You can register new events in the Events Subscriptions section of your app dashboard once you’ve verified a valid Request URL. Scroll down to Subscribe to Workspace Events and click “Add Workspace Event.” Search for the following events and click on them to add:
message.channels
message.groups
Click “Save Changes” at the bottom, and you will be prompted to reinstall the app in your workspace with the new required permissions.
Once you set this up, your server should start receiving a POST request every time any member on your team takes an action which has been registered. That request looks something like this:
{
    "event_time": 1520371464,
    "api_app_id": "A9DBMMRMX",
    "event_id": "Ev9K2EGL3T",
    "authed_users": ["U0BEWDEF6"],
    "team_id": "T0BF2H7A6",
    "token": "Jhj5dZrVaK7ZwHHjRyZWjbDl",
    "type": "event_callback",
    "event": {
        "event_ts": "1520371464.000452",
        "text": "Test",
        "ts": "1520371464.000452",
        "user": "U0BEWDEF6",
        "type": "message",
        "channel": "C5PHLJHM1"
    }
}
The key things to note are that unlike the url_verification event, this payload has the type event_callback and has an inner dictionary named event with the data you’ll be using in the following sections.
Unfortunately, Slack’s message payloads can often be inconsistent like this and lack proper documentation. The first thing I always do when trying to use a new event is simply print out the payload to a log so I know what I’m working with.
Filtering Out Non-Message Events
Was the action about a message?
Right now, that action is only “posting a message,” but as you develop a more complex app you’ll likely add more events which will all be POSTed to this one URL. In order to remain proactive, your app will use a naming convention using the prefix event_ for function names that are grabbed and used by the function handler based on the name of the event. So if the event is named message, your event handler will look for a function called event_message and pass the data on to that function.
Update the handle function in your SlackEventHandler to include this logic:
# chat/events.py

class SlackEventHandler(object):

    ...

    def handle(self, request):
        """
        Handles a Slack events POST request.
        Returns an HttpResponse.
        """
        # Parse the request body
        payload = self.parse_request(request)

        # Verify the request
        token = payload['token']
        if not self.authorize(token):
            return HttpResponseForbidden()

        # Determine the request type and correct handler function
        request_type = payload['type']
        if request_type == 'url_verification':
            event_function = self.url_verification
        elif request_type == 'event_callback':
            event_name = payload['event']['type']
            event_function_name = 'event_%s' % event_name
            try:
                event_function = getattr(self, event_function_name)
            except AttributeError:
                return HttpResponse('SlackEventHandler: %s event does not exist.' % event_name, status=200)
        else:
            return HttpResponse(status=200)

        # Runs the handler function and return the response
        return event_function(payload)

...
Now that your SlackEventHandler can handle any number of events, all you need to do when you subscribe to a new event is make a new event_ function as part of that class. Right now, you’re only subscribed to the message type, so add a function for that:
# chat/events.py

...

class SlackEventHandler(object):

    ...

    def event_message(self, payload):
        """
        Processes events with the type of "message"
        Returns 200 HttpResponse
        """
        print 'New message event!'
        return HttpResponse(status=200)
Save the file, and you should now be seeing a message saying “New message event!” in your log every time someone posts a message in a Slack channel.
Filtering Out Messages From Untracked Channels
Was the message from an entry in the Channels table?
Currently, your app handles all messages the same, no matter what channel it’s coming from. You want to make sure it’s only processing messages from channels you added to your Channels table. So first, you’ll need to add the channel through the admin.
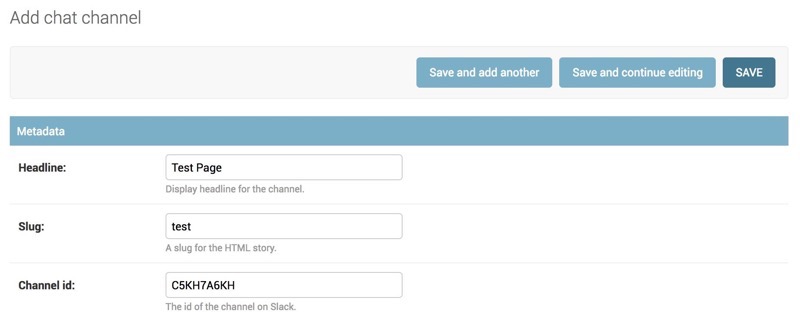
The first thing you’ll need from Slack is the Channel ID, which is actually a lot harder to get than you’d think. The easiest way I know of is to go to that channel using Slack’s web app and look at the URL. Once there, navigate to the correct channel you want to add, and the URL should be something like https://team.slack.com/messages/C5KH7A6KH/. That last part (the C5KH7A6KH) is the ID of that channel. Copy that.
Once you have it, go over to http://localhost:8000/admin/ and click “Chat channels.” There shouldn’t be any channels added yet, so add the first one by clicking “Add Chat Channel.” Add the ID in Channel ID, and the other fields are up to you to fill out as you’d like. These are the fields we used at the LA Times, but this guide won’t include any front-end design, so it’ll be up to you to use the other fields as you’d like. Hit “Save” when you’re done and you should see this channel has now been added.
Now to get to the filtering. If you remember from the payload above, the Channel ID is located inside the event dictionary as a field named channel.
Import your channels at the top of your file, and update your event_message function inside your SlackEventHandler to include logic which grabs that ID, checks it against your Channels table, and, if there is a match, continues with the code:
# chat/events.py

# You'll have to import channels into this file
from models import ChatChannel

...

class SlackEventHandler(object):

    ...

    def event_message(self, payload):
        """
        Processes events with the type of "message"
        Returns 200 HttpResponse
        """
        data = payload['event']
        channel_id = data['channel']
        channel = ChatChannel.objects.filter(channel_id=channel_id)

        if channel:
            channel = channel[0]
            print 'New message event in channel ' + channel.slug

        return HttpResponse(status=200)
Note: Django coders might be wondering why I’m using the filter method and grabbing the first entry in the array instead of the get method. The reason is to avoid extra error handling. If there are no channels, filter returns an empty array which can be checked for truthiness, while get causes a DoesNotExist error to occur.
Once you save this, you should only see log messages for new messages in the channel you added to your database. Remember that your server is still getting a POST request for messages in channel, but they’re just being ignored by your code.
Handling Message Subtypes
Does action data have message subtype? | Is subtype “message_changed”? | Is subtype “message_deleted”?
Up until now, your app has only had to deal with events caused by new messages, but the message.channels event subscription will also send your server a POST request if a message was changed or deleted. You’ll need this information to keep your app’s database records up to date.
When a message is updated, Slack sends a payload that looks like this:
{
    "event_time": 1520375226,
    "api_app_id": "A9DBMMRMX",
    "event_id": "Ev9KGVDNAX",
    "authed_users": ["U0BEWDEF6"],
    "team_id": "T0BF2H7A6",
    "token": "Jhj5dZrVaK7ZwHHjRyZWjbDl",
    "type": "event_callback",
    "event": {
        "event_ts": "1520375226.000382",
        "ts": "1520375226.000382",
        "subtype": "message_changed",
        "message": {
            "text": "test 2",
            "type": "message",
            "user": "U0BEWDEF6",
            "ts": "1520374995.000498",
            "edited": {
                "user": "U0BEWDEF6",
                "ts": "1520375226.000000"
            }
        },
        "type": "message",
        "hidden": true,
        "channel": "C5PHLJHM1",
        "previous_message": {
            "text": "test",
            "type": "message",
            "user": "U0BEWDEF6",
            "ts": "1520374995.000498"
        }
    }
}
A couple of things you’ll notice is that this payload doesn’t have the text in the event dictionary anymore. Rather, the new text is in a dictionary one level deeper called message. You might also notice that event now has a subtype field which in this case is called message_changed. Remember what I said about these payloads being inconsistent?
If the payload event dictionary has no subtype, then the message is a new message that was posted to a channel. If it does have a subtype, it’s likely one of two: message_changed (the user edited a message that already existed) or message_deleted (the user or an admin deleted a message).
Your app will use a similar trick for processing the subtypes as it does with the event type. The prefix this time will be message_ + the subtype. So if the subtype is message_changed, the app will look for a function called message_message_changed and pass the payload data to it. The exact logic of handling these messages will be done in another file which you’ll create later called tasks.py. The reason for this is so you can easily optimize your code to use multiple threads (but that’s beyond the scope of this tutorial).
For now, import the tasks and make each of these three functions (you can add one for message_added even though it technically doesn’t have a subtype):
# chat/events.py

# You'll have to import tasks into this file
import tasks

...

class SlackEventHandler(object):

    ...

    def message_message_added(self, channel, data):
        tasks.new_message(channel, data)
        return HttpResponse(status=200)

    def message_message_changed(self, channel, data):
        tasks.update_message(data)
        return HttpResponse(status=200)

    def message_message_deleted(self, channel, data):
        tasks.delete_message(data)
        return HttpResponse(status=200)
And now update the event_message function to handle these subtypes (calling message_message_added if there is no explicit subtype):
# chat/events.py

...

class SlackEventHandler(object):

    ...

    def event_message(self, payload):
        """
        Processes events with the type of "message"
        Returns 200 HttpResponse
        """
        data = payload['event']
        channel_id = data['channel']
        channel = ChatChannel.objects.filter(channel_id=channel_id)

        if channel:
            channel = channel[0]
            subtype = data.get('subtype', None)
            if subtype:
                subtype_function_name = 'message_%s' % subtype
                try:
                    subtype_function = getattr(self, subtype_function_name)
                except AttributeError:
                    return HttpResponse(
                        'SlackEventHandler: %s event message subtype does not exist.' % subtype,
                        status=200
                    )
                return subtype_function(channel, data)
            else:
                return self.message_message_added(channel, data)

        return HttpResponse(status=200)

    ...
Learning To Listen To Slack, Not Just Hear It
Let’s take a second to recap what’s going on.
Slack is sending your server POST requests at the path of /slack/ which you set up in urls.py. Those requests are being sent to your SlackEventWebhook view inside views.py. They are then immediately sent over to to your SlackEventHandler inside events.py which parses the request, verifies that it’s coming from Slack, checks to make sure it’s about a message inside a tracked channel, and then sends the data to be processed by one of three tasks inside a file called tasks.py which doesn’t exist yet. So it’s time to bring it all together with that last file.
Make a file called tasks.py inside your Chat app folder. Your terminal might be showing an ImportError because tasks hadn’t been created yet. Now that you have, you can restart your server with python manage.py runserver.
Open tasks.py and fill it with the following:
# chat/tasks.py

import re
import json
import os
import views as chat_views
from chat.models import ChatChannel, ChatUser, ChatMessage
from django.conf import settings

CHAT_COMMENT_TAG = '<#>'


def new_message(channel, data):
    simple_text = data.get('text', '')
    comment_regex = r'^\s*{}'.format(CHAT_COMMENT_TAG)
    if not re.match(comment_regex, simple_text):
        user, c = ChatUser.objects.get_or_create(
            user_id=data['user']
        )
        m = ChatMessage(
            data=json.dumps(data),
            user=user,
            channel=channel
        )
        m.save()


def update_message(data):
    m = ChatMessage.objects.get(ts=data['message']['ts'])
    m.data = json.dumps(data['message'])
    m.save()


def delete_message(data):
    try:
        m = ChatMessage.objects.get(ts=data['deleted_ts'])
    except ChatMessage.DoesNotExist:
        m = None
    if m:
        m.live = False
        m.save()
Most of this is typical Django code for creating and editing existing records. If you need a refresher on that you can check out the documentation.
There are a couple of things I do want to point out, though. The first is the line
CHAT_COMMENT_TAG = '<#>'
You’ll also notice I’m querying the Messages table using the ts field. Recall from the database diagram that Slack uses ts as a form of unique identifier because of the precision of the timestamp.
The last thing is the varying location of that timestamp. Since message_changed has a message and previous_message dictionary inside the event data, you have to get the ts value from one of those (they’re the same since they refer to the same message). message_deleted, on the other hand, has the timestamp in a field called deleted_ts inside the event data.
Once you’ve done this, your app should now start accurately recording new messages and any updates to those messages. You can find them in the admin panel of your app localhost:8000/admin inside of Chat messages. The user field will be blank because you haven’t added any users yet (more on that later).
Talking To Users Other Than Slack
Creating The JSON View
Once you have your app working, there are all kinds of things you can do with it. To keep it simple, we’re just going to create a simple API endpoint which will serve a JSON file for a particular channel. You’ll need to make a new view for this in views.py with a couple more imports.
# chat/views.py

...

from chat.models import ChatChannel, ChatMessage
from django.http import JsonResponse
from django.test.client import RequestFactory
from django.utils.decorators import classonlymethod
from django.http import Http404

 ...

class ChatJson(View):
    """
    Local JSON feed for a particular Chat channel and its messages.
    """
    @classonlymethod
    def as_string(self, object):
        """
        Renders and returns the JSON response as a plain string.
        """
        request = RequestFactory().get('')
        response = self.as_view()(request, channel=object.channel_id)
        return response.content

    def get_chat_messages(self, channel):
        """
        Get all the messages from channel not marked as deleted.
        """
        if ChatChannel.objects.filter(channel_id=channel).exists():
            self.channel = ChatChannel.objects.get(channel_id=channel)
            self.messages = ChatMessage.messages.live().filter(
                channel__channel_id=channel
            )
            return True
        else:
            return False

    def get_json(self):
        """
        Creates the JSON feed structure with the necessary elements.
        """
        output_messages = []
        for message in self.messages:
            output_message = {
                'html': message.html,
                'ts': message.ts,
                'user': {
                    'image_48': message.user.image_48,
                    'display_name': message.user.display_name
                }
            }
            output_messages.append(output_message)

        return JsonResponse({
            'channel': {
                'id': self.channel.channel_id,
                'headline': self.channel.headline,
                'slug': self.channel.slug,
                'description': self.channel.description,
                'live_content': self.channel.live_content,
            },
            'messages': output_messages
        })

    def get(self, request, *args, **kwargs):
        """
        Returns the latest JSON feed.
        """
        if self.get_chat_messages(self.kwargs['channel']):
            return self.get_json()
        else:
            raise Http404("Channel does not exist")
Then, add the route to urls.py with the Channel ID as a parameter (notice that this addition should go inside the urlpatters list which already exists):
# chat/urls.py

...

urlpatterns = [

    ...

    url(
        r'^api/(?P<channel>.*)$',
        chat_views.ChatJson.as_view(),
        name='chat_api'
    ),

]
Now if you go to http://localhost:8000/api/[YOUR_CHANNEL_ID] replacing it with the ID of the channel in your database. You should see a JSON file with the channel and messages data.
Publishing The JSON View as a File
Recreate and republish the channel’s JSON file
That’s great, but your server is constantly having to generate that JSON file over and over unnecessarily, and it only really changes when there’s a new message. So instead of using that view to generate the file each time, it’s easier on the server to instead make the file once, save it, and serve it as a static file when it’s requested.
The LA Times’s Chat app creates a JSONP file and uploads it to an AWS bucket. Your app will just host it locally to keep things simple (if you expect your server to receive heavy traffic you should consider using something like AWS).
Make a folder in the Chat app folder called .json. You’ll put the code to generate the file in the tasks.py file. Again, this is to easily thread this process in the future—you don’t want your server getting stuck because it’s busy uploading a file to AWS. Make a new function called publish_json.
# chat/tasks.py

...

def publish_json(channel_id):
    """
    Render and publish a JSON feed representation of a channel
    to a local file
    """
    # Get the Channel obj
    channel = ChatChannel.objects.get(channel_id=channel_id)

    # Get the JSON from the ChatJson and convert to JSONP
    json_string = chat_views.ChatJson.as_string(channel)
    jsonp_string = "%s(%s);" % ("callback", json_string)

    # Used for development or small server load.
    # Consider uploading to a server bucket instead for optimal performance.
    with open(os.path.join(settings.ROOT_DIR, 'chat', '.json', '%s.jsonp' % channel_id), 'w') as f:
        f.write(jsonp_string)
This will still call the view you just made to generate the JSON file, but then it will save a JSONP file of it inside the .json folder.
The only thing left to do is decide when to run it. Your app will need to update anytime there’s a change to a message record or a channel record, so it’s best to run this function anytime the save method is run on those two models. For more on the save method, check out the documentation.
Add/edit the save method to both models with the following code:
# chat/models.py

class ChatChannel(models.Model):

    ...

    def save(self, *args, **kwargs):
        import tasks

        super(ChatChannel, self).save(*args, **kwargs)

        tasks.publish_json(self.channel_id)

...

class ChatMessage(models.Model):

    ...

    def save(self, *args, **kwargs):
        ...

        # This should go underneath the call to super()
        import tasks
        tasks.publish_json(self.channel.channel_id)
Once you have this code, your app will save a new JSONP file every time a new message is posted in a tracked channel or when a channel is edited through the admin. Now you just need to serve those files through an extra route in urls.py (you’ll also need to import three more modules):
# chat/urls.py

import os
from django.conf import settings
from django.views.static import serve

...

urlpatterns = [

    ...

    url(r'^json/(?P<path>.*)$', serve, {
        'document_root': os.path.join(settings.ROOT_DIR, 'chat', '.json'),
        'show_indexes': True,
    }),

]
Post a new message in your channel, and you should see a new file in the .json folder called [YOUR_CHANNEL_ID].jsonp. If you go to http://localhost:8000/json/[YOUR_CHANNEL_ID].jsonp you’ll download the file.
Bringing In Your Friends (optional)
You might notice that I haven’t mentioned users since you made the model. Those have to be added to the database, but doing so one by one would be a nightmare. For that reason I wrote a quick management command to handle that for you. This is the optional section, so I’ll breeze through it real fast. If you want to know more about Django management commands, you can check the documentation.
First, make the management command folder structure inside the Chat app folder.
chat
   ├── chat
   │  ├── management
   │  │  ├── __init__.py
   │  │  └── commands
   │  │     ├── __init__.py
   │  │     └── updateusers.py
   │  └── ...
   └── ...
Most of those new files can stay empty, but in updateusers.py paste the following code:
# chat/management/commands/updateusers.py

from django.conf import settings
from django.core.management.base import BaseCommand
from chat.models import ChatUser
from slackclient import SlackClient


class Command(BaseCommand):
    help = "Updates the list of slack users in the database"

    # list of fields to check for updates
    UPDATE_FIELDS = [
        'name',
        'real_name',
        'image_24',
        'image_32',
        'image_48',
        'image_72',
        'image_192'
    ]

    def add_arguments(self, parser):
        """
        Adds custom arguments specific to this command.
        """
        parser.add_argument(
            '--verbose',
            action="store_true",
            help="Don't print out a progress log."
        )

    def log_progress(self, msg):
        if self.verbose:
            print msg

    def handle(self, *args, **kwds):
        sc = SlackClient(settings.SLACK_BOT_TOKEN)
        self.verbose = kwds['verbose']

        users = sc.api_call('users.list')['members']

        for slack_user in users:
            slack_id = slack_user['id']
            self.log_progress('Checking "%s"...' % slack_user['name'])
            change_found = False

            # If it exists update it
            if ChatUser.objects.filter(user_id=slack_id).exists():
                self.log_progress('"%s" exists, checking fields...' % slack_user['name'])
                db_user = ChatUser.objects.get(user_id=slack_id)

                for field in self.UPDATE_FIELDS:
                    # Get the db value for the field
                    db_field = getattr(db_user, field)

                    # Get the slack API call value for the field
                    if field[:6] == 'image_':
                        user_field = slack_user['profile'][field]
                    else:
                        user_field = slack_user.get(field, None)

                    # Compare the fields and update if different
                    if user_field and db_field != user_field:
                        self.log_progress('Change Found: Updating "%s" from "%s" to "%s" for user "%s"' % (
                            field,
                            db_field,
                            user_field,
                            slack_user['name']
                        ))
                        change_found = True
                        setattr(db_user, field, user_field)

                if change_found:
                    db_user.save()
                    change_found = False

            # If not, add it
            else:
                self.log_progress('No user found. Adding "%s".' % slack_user['name'])
                user_data = {
                    'user_id': slack_id,
                    'name': slack_user.get('name', ''),
                    'real_name': slack_user.get('real_name', ''),
                    'image_24': slack_user['profile'].get('image_24', ''),
                    'image_32': slack_user['profile'].get('image_32', ''),
                    'image_48': slack_user['profile'].get('image_48', ''),
                    'image_72': slack_user['profile'].get('image_72', ''),
                    'image_192': slack_user['profile'].get('image_192', ''),
                }
                u = ChatUser(**user_data)
                u.save()
All this command does is scrape your Slack team and import all the data into your database. You probably want to run this every so often as team members are often updating profile images or being added. To run it using the Django management system use the following command in your terminal (if you’re the type of coder who likes to see process logs, you can add the –verbose flag to it):
$ python manage.py updateusers
Unfortunately it won’t update the records for past messages so you’ll definitely want to run this before you start recording messages.
You’re Finished!
Congratulations, you’ve successfully built the backend of the Chat app! With the JSON API endpoint you can power a frontend with all kinds of designs. This app was also the first time the LA Times Data Desk implemented ES6 code in a Django app, but this tutorial has gone on for long enough, so maybe next time.
It’s important to point out that creating this app is designed to teach you one way a Slack-powered live chat works, not to give you the code you need to start using your own. You can take these concepts and combine them with what you know about building web applications at the scale necessary for your organization. You probably don’t want to save data in an SQLite database, run your server with Django on your local computer, or store JSON files statically inside your app. For example, at the LA Times, we save data in a PostgreSQL database, use Apache to serve the app, run the app on an EC2 server, and save our JSON files in an S3 bucket. This works for our needs, but you may need more or less depending on how active your Slack channel is and how active your web pages are.
For now, take a break from coding, pat yourself on the back for pushing through this, and start thinking about cool ways to use this API you’ve built. If you do make anything with it, I’d love to see it.
If you have questions, feel free to reach out. You can find me through email (briz.andrew@gmail.com), Twitter (@brizandrew), GitHub (brizandrew), or the News Nerdery Slack if you’re on there (brizandrew).
Organizations
Credits
-
 Andrew Briz
Andrew Briz is news developer who creates web pages, platforms, and applications for the creation and distribution of media—from journalism tools to interactive stories. He’s currently the lead developer at the University of Florida’s College of Journalism R&D group, Hatch, until he graduates in May of 2018. He interned at the LA Times Data Desk for the summer of 2017, and he’ll be interning at The Washington Post this summer. Then he’ll be looking for a job.