Features:
How Slack Controls Our CMS
Interactive Slack buttons, coming to you straight from the LA Times

Three pixels to the left, please. (Dan Ruscoe)
Visit the “Latest Stories” page. See what’s new. Copy the slug. Go to the collections. Click the right row. Paste the slug. Hit save.
That was the multi-step process of adding a story to the homepage of the LA Times up until a few weeks ago. Now, you just click a button.
New stories automatically drop into our Slack chat channel. They have buttons that list sections of our homepage like the “Head Deck.” Click one, and the story will appear on the homepage moments later. Your action will be logged in the chat.
As an intern at the LA Times Data Desk, I’ve seen the benefits of building tools like this for journalists first hand. From managing copy edits to tracking our coffee, our news nerds constantly look for any way to improve the reporting grind. We’re seated in the middle of the newsroom and collaborate with reporters every day. Many of us even play both roles. Just a week after deploying these Slack buttons, the LA Times published my first byline here, an election map.
The small apps and optimizations we build may not be the overhaul in CMSs that we all want, but they let our editors and reporters focus more on the story and less on copying and pasting. If you follow this guide, you’ll be able to do the same.
Here’s how I made our latest integration, Slack buttons for the homepage team, work.
Managing a homepage is just one use of Slack’s new interactive messages. With that in mind I’ve made this guide to be as language- and task-agnostic as possible. Even though the app we’ll build uses a lightweight Python framework called Flask to manage categories, the programming logic can be easily ported to any language, framework, and task.
Before we get started, there are a few things you’ll need:
- Our Homepage Slack bot is integrated with our feed app which fetches stories from our story feeds and posts them into a channel. This can take a number of forms. You could build an RSS parser that connects to your website’s RSS feed with feed parser or a JSON feed. We use hits to our CMS’s API. That app isn’t part of this guide. You’ll want to add the logic in Sending a Slack Message with Buttons to whatever you create.
- Your CMS will need an API that allows you to manage your stories. If you’re using our company’s Content Services CMS, we have a Python wrapper for you. Other popular CMSs like Wordpress have their own API as well.
- You’ll need access to an SSL Enabled server to host your webhook (this is a Slack requirement). Your hosting provider should have settings for enabling SSL. For instructions on how to set up your localhost server on a publicly facing SSL enabled address read our optional guide below.
Setting up Your Slack App
The first thing to set up is your Slack app. Go to the Slack API website to create a new app. Give it a name and choose the team you want to own the app. The name is only for back-end use or distribution—it won’t appear in your Slack channel.
Once your app is built, you’ll have to build a bot for it to interact with your team’s Slack.
Navigate to Bot Users, and click “Add Bot User.” Give your bot a name and click “Add Bot User” again to confirm.
To get the credentials you’ll need, install the app on your team—even if that team is the same as the development team. Navigate to OAuth & Permission and click “Install App to Team.” This will take you through the default Slack authorization screen. That should redirect you to the OAuth screen. Copy the Bot User OAuth Access Token and save it for later.
You’ll also need your Slack app’s verification token to authenticate it.
Navigate to Basic Information, scroll down, and find App Credentials.
Copy your Verification Token and save it for later, too.
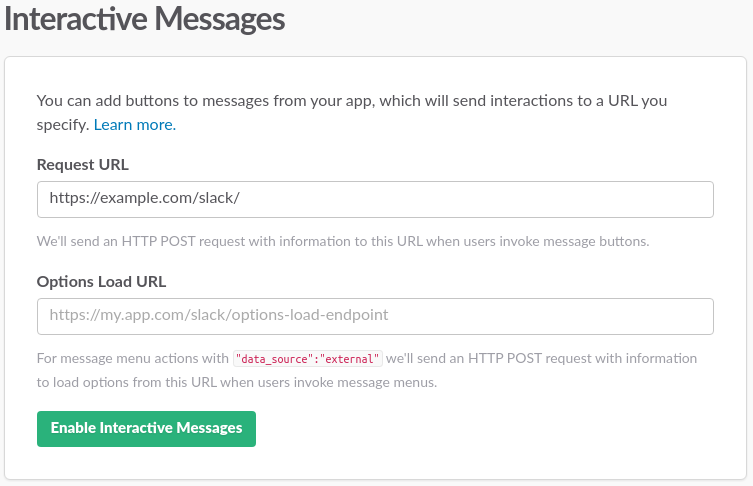
Finally, it’s time to set up the webook. Navigate to Interactive Messages under Features and turn them on. Fill in the Request URL with the SSL Enabled Webhook address, which we’ll set up later. Keep in mind that this webhook will be used for all the interactions associated with this app. If you want more than one action, you’ll have to handle that on one webhook. More on that later.
Setting up the Example Repo
To follow along with this guide, download this repo and follow the installation instructions.
After installing the app open up app.py in a text editor to fill in your Slack App’s information.
Here you can change the display name and icon for your Slack posts. Our test app uses the following information:
SLACK_BOT_TOKEN = '[BOT_TOKEN]'
SLACK_VERIFICATION_TOKEN = '[VERIFICATION_TOKEN]'

SLACK_CHANNEL = '[CHANNEL]'
SLACK_USERNAME = '[BOT_USERNAME]'
SLACK_ICON = '[BOT_PROFILE_IMAGE_URL]'
Next, set up the button layout. Each button should be a dictionary with a name, display, and value.
nameis used for the slug value of the category—a short string with no spaces that will be used by our programming logic.displayis the name of the category as it will appear in the button. They can be the same but the option is there incase your categories are multiple words.valueis the starting action for the button.Trueis interpreted by our app to mean “when this button is clicked, add it to the category,” whileFalseremoves it.headline: The title of the storyurl: A link to the storydescription: A brief description of the story - slug: A slug for internal usethumbnail(optional): A photo for the story. We’ll be posting a 1928, LA Times article about the potential of robots to free us from work. That story dictionary looks like this:- The original message
- The story slug
- The category of the button pressed
- The action of the button pressed
- The id of the channel the message was in
- The message’s timestamp (which serves as its unique identifier in Slack)
- The username of the person who clicked the button
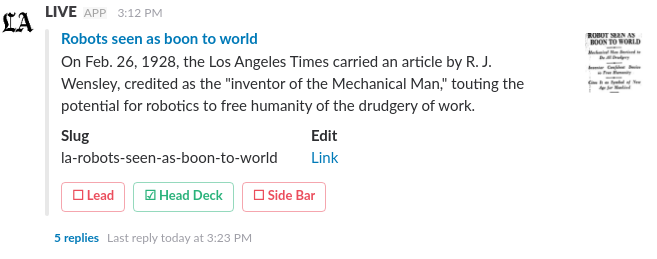
Our test app has three buttons which represent three sections of a homepage. Each button has a display name, an example slug, and are set to True.
SLACK_BUTTONS = [
    {
        'name': 'lead_story',
        'display': 'Lead',
        'value': 'True'
    },
    {
        'name': 'head_deck',
        'display': 'Head Deck',
        'value': 'True'
    },
    {
        'name': 'sidebar',
        'display': 'Side Bar',
        'value': 'True'
    }
]
Once all this is set up, you’re ready to start sending some buttons.
Sending a Slack Message with Buttons
In order to make buttons do something for your team, you’ll first have to put them there. Our test repo comes with a function to send interactive messages to your Slack channel. It takes one argument which is a dictionary with the following keys:
{
   'headline':'Robots seen as boon to world',
   'url':'http://documents.latimes.com/robots-seen-boon-world/',
   'description':'On Feb. 26, 1928, the Los Angeles Times carried an article by R. J. Wensley, credited as the "inventor of the Mechanical Man," touting the potential for robotics to free humanity of the drudgery of work.',
   'slug': 'la-robots-seen-as-boon-to-world',
   'thumbnail': 'http://www.trbimg.com/img-59372291/turbine/la-robots-seen-as-boon-to-world-20170606/600'
 }
Our test app has a route at “/test-add-story” which will call our message posting function, add_story, passing it the dictionary. In your app, you’ll to run this function as you parse your own incoming story feed.
Slack messages have a number of formatting options. You can read the full Slack Message documentation and use the message preview tool.
For now, we’ll use a template I created. The main part of our message will be a Slack message attachment. Attachments are dictionaries with message content formatted in a specific way you want. You can read about all of the attachment keys and options in the official attachment documentation.
Our story will only be using one attachment, but there are some cases where you’ll want to break up the content as we’ll discuss later. The key thing to take note of is the callback_id. We’ll use this later to figure out which action a button click should trigger in your webhook. This is what the base attachment (without the buttons) for our story will look:
attachments = [
        {
            'fallback': story['headline'],
            'title': '<'+story['url']+'|'+story['headline']+'>',
            'title_link': 'https//example.com/' + story['slug'],
            'thumb_url': story['thumbnail'],
            'callback_id': 'button_test',
            'actions': [],
            'fields': [
                {
                    'value': story['description']
                },
                {
                    'title': 'Slug',
                    'value': story['slug'],
                    'short': True
                },
                {
                    'title': 'Edit',
                    'value': '',
                    'short': True
                }
            ]
        }
    ]
Now let’s add the buttons we created above. We’ll want to add each of them to our attachment’s “action” key. You’ll notice we set it to an empty list above. We’ll loop through our predefined buttons list and add them. These are just some of the options for our buttons. For all of them, check out Slack’s button options documentation.
Note that Slack message attachments have five-button limit. If you need more than five buttons in your message, you’ll have to create another attachment.
for button_dict in SLACK_BUTTONS:
    button = {
        'type':'button',
        'name':button_dict['name'],
        'text': '☐ ' + button_dict['display'],
        'value':button_dict['value'],
        'style':'danger',
    }
    attachments[0]['actions'].append(button)
Now that our attachment has its buttons, it’s time to send the message to Slack. There are a number of official developer kits from Slack for multiple languages as well as third-party libraries. We’ll be using a one called pyslack (not pyslack-real), which really only handles encoding our message and sending it to the right URL.
The last part of our add_story function uses pyslack to send the message:
http_client.post(
    'chat.postMessage',
    dict(
        token=SLACK_BOT_TOKEN,
        channel=SLACK_CHANNEL,
        username=SLACK_USERNAME,
        icon_url=SLACK_ICON,
        text='',
        attachments=json.dumps(attachments)
    )
)
http_client is the name of pyslack’s request handler and post is the function for sending POST requests. The first argument is the API call you want to make. For a full list of API calls, check out the official documentation.
The second argument is another dictionary which takes the preset settings we defined at the top of our file. We leave text blank, because all of our content is in the attachments, and we convert our python dictionary into JSON and pass it into attachments.
Visit your /test-add-story route, check your Slack channel, and you should see a message with buttons!
Accepting Button Requests
When a user clicks one of the buttons, Slack will send a POST request to the Request URL you set up in the Slack app settings.
Note that some frameworks like Django don’t allow POST requests from outside sources by default, because of their cross-site request forging protections. This is something you’ll want to look into for the framework you’re using. Luckily, we won’t have any issues with Flask.
The first thing is to configure the /slack route on our server to handle the request. Configure your handler to do three things: parse the request, authenticate the payload, and pass the request on to the function handling that button’s specific callback.
@app.route('/slack', methods=['POST'])
def webhook():
    payload = parse_request(request)

    token = payload['token']
    if not authorize(token):
        return ('', 403, None)

    callback_id = payload['callback_id']
    if callback_id == 'button_test':
        return update_message(payload)

    return ('', 400, None)
Our test handler breaks those into separate functions and returns the right http response. We send the request off to get parsed so we can access it as a Python dictionary. Then, if the token isn’t valid, we return a 403 (Forbidden) response. We grab the callback_id (which we set up in the original button message) and begin a conditional chain to determine which action function to run depending on the callback_id. In our case, there’s only one called button_test.
If no other function gets called, we return a 400 (Bad Request) response.
Let’s take a look at each part of the handler.
Parsing the Request
Parsing will be highly dependent on your language and framework. Our test app shows how to do it in Flask.
When a button is clicked, our webhook will receive a URL encoded JSON object in the request body with information about the action and the original message. Clicking on the lead button in our test story message will send this request.
You’ll need to parse the url-encoded JSON payload into something like this.
Then it can be parsed by a JSON parser to convert it into a Python dictionary.
Authenticating the Payload
def authorize(token):
    return token == SLACK_VERIFICATION_TOKEN
Slack will send our app’s verification token in the POST request. This is the verification token found in the App Credentials section, not the bot token. This simple function checks to make sure that the tokens match, and returns True if they do. This function can be merged into the main handler function, but I keep them separate in case I want to add further authentication, like specific user permissions.
Fulfilling An Action
Once our handler has determined the action to take, it’ll run our action function. Our test app will create an action function that updates our story’s status in the database, recreates the original message with the story’s new statuses, updates the Slack message with this new message, and optionally posts to the message’s thread to log that an action was taken.
First, though, we need to take out the data we want from the newly parsed POST request. Our test app shows how to do that in Flask.
You’ll need the following information:
Updating the Story
Because this is just a test app, it’s not hooked up to any database. For our purposes, we’ll be using a dictionary that gets recreated every time the server starts up called fake_database.
Our function sets the status of our story in the particular category to the value of our button with a simple variable assignment.
On your app, the story’s data should be held in some sort of data structure independent of the bot server (like a CMS) and be manipulated through an API hit.
The next thing you want to do is check the status of your story in each category. You want to re-check them because things might have changed since the last time a button was clicked. It could have been updated manually, or if you end up threading the processes, you could run into conflicts with multiple people hitting buttons. Our test app handles that in a separate function named get_statuses and returns the status into a variable named active_categories.
Updating the Slack Message
Now that the we’ve changed the story’s status and gotten its updated status for each of the categories, we need to change the message in Slack. Slack’s API currently doesn’t have any way to update only certain parts of the message. You have to override it. Luckily, the webhook request comes with the contents of the original message.
The first thing we do is make a copy of the original message and reset the actions list, because that’s the only part that will change.
    new_message = dict(original_message)
    new_message['attachments'][0]['actions'] = []
for button in SLACK_BUTTONS:
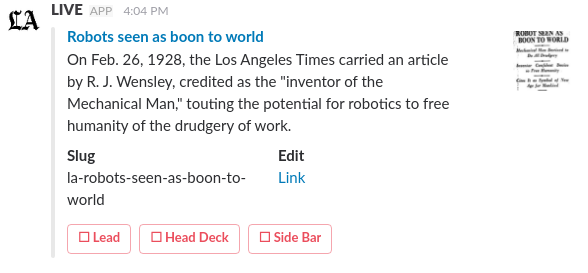
slug_name = button['name']
status = not active_categories[button['name']]
if status:
style = 'danger'
action_text = '☐ '
else:
style = 'primary'
action_text = '☑ '
text = action_text + button['display']
button = {
'name': slug_name,
'text': text,
'style': style,
'type': 'button',
'value': str(status)
}
new_message['attachments'][0]['actions'].append(button)
Just like before, we’ll use pyslack’s http_client.post method to update the Slack message. Instead of using chat.postMessage as the API method, we’ll use one called chat.update, and we have to pass one extra parameter to the options dictionary called ts, which indicates which message should be updated.
http_client.post(
    'chat.update',
    dict(
        token=SLACK_BOT_TOKEN,
        username=SLACK_USERNAME,
        icon_url=SLACK_ICON,
        text='',
        channel=channel_id,
        ts=message_ts,
        attachments=json.dumps(new_message['attachments'])
    )
)
Creating a Thread Log (Optional)
If you want to keep a log in the Slack channel of the time of each button-click and the name of the clicker, you can do so using Slack’s message threads. Using the options we got from the webhook request payload, we can construct our log message.
thread_message = username + ' updated this story\'s status in ' + category + ' to ' + action_value
Then send a Slack API postMessage without any attachments and with thread_message as the text. We’ll also need to set the thread_ts to the message_ts to tell Slack which message this should respond to. For more information on threading messages, check the documentation.
http_client.post(
    'chat.postMessage',
    dict(
        token=SLACK_BOT_TOKEN,
        channel=channel_id,
        username=SLACK_USERNAME,
        icon_url=SLACK_ICON,
        text=thread_message,
        thread_ts=message_ts
    )
)

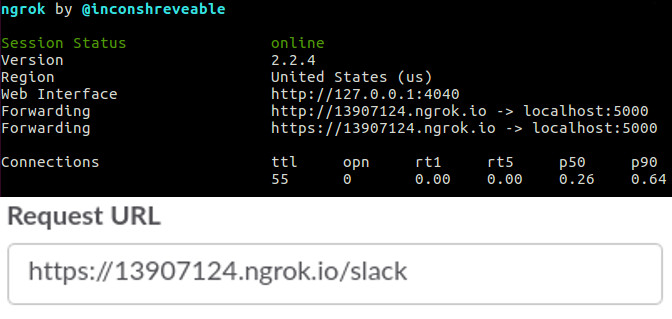
Setting up a Localhost Webhook Server (Optional)
If you want to test this repo with a real Slack team, you’ll need a way to make it publicly available and SSL enabled. You can do this using ngrok. Follow the documentation to install and run it on your local machine. Once it’s running, you should see a forwarding URL in your terminal window. Put that URL with the correct route in the Request URL box in your Slack app’s settings.
Click Away
Now that you have your buttons, the only thing left to do is start clicking! Our homepage team has been using these buttons for a couple of weeks now, and except for a few bugs, it’s been working great.
A lot of early examples of Slack buttons were simple “Approve” or “Deny” interactions, but you can do so much more with them. Categories is just one thing we came up with. You can look into message menus or ways of incorporating slash commands. I’d love to see how you can push this programming logic even further.
Fork our repo if you want to get started with Flask, or start from scratch. Reach out to me if you have any questions and to share what you’ve been able to do with interactive messages. You can contact me by email (briz.andrew@gmail.com), Twitter (@brizandrew, or on the News Nerdery Slack (brizandrew).
Happy coding!
Credits
-
 Andrew Briz
Andrew Briz is news developer who creates web pages, platforms, and applications for the creation and distribution of media—from journalism tools to interactive stories. He’s currently the lead developer at the University of Florida’s College of Journalism R&D group, Hatch, until he graduates in May of 2018. He interned at the LA Times Data Desk for the summer of 2017, and he’ll be interning at The Washington Post this summer. Then he’ll be looking for a job.